Thursday 24 December 2015

Christmas Make up Look!

Hello everyone and Merry Christmas!!!

I've decided to do a make up look which is perfect for the Christmas holidays or for Christmas day.  I did this beautiful golden and red-ish colour for the eyes and a red/orange lip!  Continue reading if you would like to know how I got this look right here and the products I used!


This is not a heavy make up look, it's very subtle but then you have this popping lip colour and of course that fierce wing which I can't live without.  This lipstick is my new liquid lipstick, which is really long lasting and it's from the Amrezy collection and it's called Brooklyn.  I bought this online from this site called LipLand, I have to admit, it is quite expensive but I was dying to buy it because Amrezy is one of my favourite Instagrammers.

Products used for the face:
- Foundation; Maybelline 24hr Super Stay in the colour Sand (30).
- Powder: Max Factor Translucent powder. IMP. to set all your foundation!
- Contour and Highlight; Sleek contour kit with my MAC "Soft and Gentle" highlighter and the Stefania D'Alessandro eye shadow in "Pearl".  Obsessed with this product!!
- Blush; NYX "Intuition".


For my eyebrows; 
Catrice 040 "Don't Let me Brow'n" pencil, H&M powder over that and the Maybelline Brow Drama, dark blonde, over everything to set the eye brow hairs in place, 

Products used for my eyes;
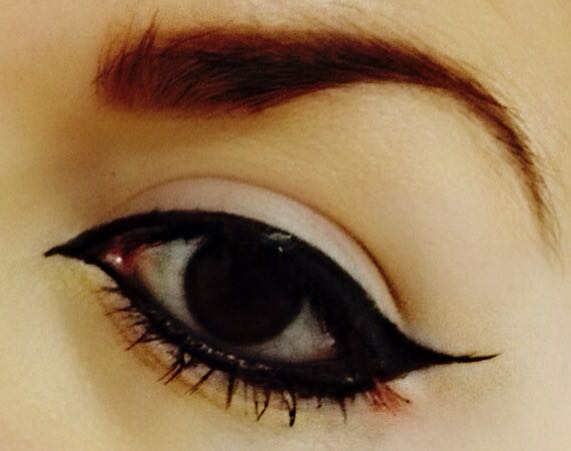
Eye shadows; my favourite NYX "Love in Paris" palette.  I used the gold shade on my lid (top in the middle), the dark brown on the inner corner of my crease (the one beneath the gold), the orange colour as my base colour for the crease and the red-ish colour shade down below all over the crease.  To highlight my tear duct, I used the same Stefania D'Alessandro eye shadow in "Pearl". 


And yes of course I used the NYX Liquid Eye liner for my winged liner.  I absolutely love NYX products, I think they are sooo amazing and affordable!  There are so many extremely expensive make up products and then you can find the exact same product for nearly half the price or more.  

Then I lined my waterline with the Catrice 010 Ultra Black eye pencil - which is amazing!  I bought it for around 2 euros and 50 cents I think....and it's just fantastic.  The brow pencil was also around the same price and it's great.  Super happy with these two new purchases.  
Moving on to mascara; Essence "Multi-Action" volume mascara and then I applied my Minx False Eye lashes which are also so beautiful!!! I bought them off EBAY for only 2 euros - isn't that crazy right?! And look how beautiful they look. 


And that's it right there!!  This gorgeous eye look with a bright lip, perfect for the festive season.  I am really sorry that the picture quality isn't that great of my photos....however, I am hoping that with my new camera which I will be getting on Christmas, I'll manage to capture amazing photos of my make up looks. So stay tuned for those!! 

And my next blog post is going to be a New Year's Eve look, totally excited for that one, are you guys excited?

Would truly love to wish all my friends, family and you guys - a very Merry Christmas!  Hope this special day brings lots of love and happiness to you all.  Thank you all for supporting me with my blog, you have no idea how much this means to me.  Love bumping into some of my friends and then they'll be praising me about my blog, means the world to me so THANK YOU!!!  


So much love to you all - Suzanne P.D. 


Tuesday 15 December 2015

Stefania D'Alessandro Make Up

Hey everyone and welcome back!

This post is going to be about this make up brand called Stefania D'Alessandro.


Last Saturday I attended an event about this make up brand and their were two extremely talented make up artists applying make up on others using just Stefania D'Alessandro products.  I went with my sister and I got to witness the make up artist applying the products on my sister and I can truly say that the make up looks amazing.  The eye shadows were all so pigmented and there were so many beautiful colours.  This is all professional make up.  The foundation, powders, eye shadows, the mascara, etc; were just all amazing.  I am definitely going to buy more products from this brand.


The eye shadows definitely were my favourite product from this brand.  They had a whole set of glittery eye shadows that were just to die for! You could also buy the palette and then buy the individual eye shadows so that you could place them there.   Like this your eye shadows wouldn't be running around everywhere which I thought was such a great idea.  Here are the eye shadows below:


I bought the first eye shadow on the top left, which is called Pearl.  It is a beautiful shimmery white eye shadow, which is perfect for the inner corner of the eye, under the brow bone and as a highlighter - for the cupid's bow, nose and your cheekbones.  It's a perfect eye shadow and highlighter!  I bought the individual eye shadow for 14 euros.  It's quite big and you do not need to apply a lot of product because it's extremely pigmented, I feel it's totally worth the price.  Below there's the photo.


I totally fell in love with this eye shadow and I totally recommend this product :)  Stefania D'Allessandro is such an amazing brand, with extremely pigmented and long lasting products, definitely worth a try!

Do you own any products from this brand? 


Lots of Love - Suzanne P.D.

Friday 11 December 2015

Grad Ball Make up Look!

Hey everyone and welcome back!

I feel it's been a while since I last posted something and I apologize for that.  Today's post is going to be about a beautiful glittery and shimmery make up look which is perfect for the Grad Ball!!  As some of you might know, on Saturday 12th of December, there is the KSU Grad Ball, basically a graduation party.  I will be going with my best friend and I'm so excited!  The first thing that comes to my mind when someone mentions the Grad Ball are beautiful dresses, glitter and loads of glam.  So, of course you would need gorgeous make up and I chose to go for this look below - a silver shimmery cut crease eye look.  I feel it's perfect for this kind of event and your eyes would definitely pop!  You can also use a gold shimmery eye shadow which would look just as amazing.


For this make up look I used the Essence "All About Greys" palette and the Make Up Revolution "Awesome Metals" foil in Silver.  For my brows I used the Catrice eye brow pencil in the colour brown, their eye pencil on the water line and used their mascara also.  You all know what liquid eye liner I used for sure - it's my all time fav NYX eye liner. Create that beautiful slim wing to really make the look!


Here are two videos of the eye make up.  I feel in the videos you can really see that beautiful glittery silver eye shadow.  I used black and grey on the crease and  also blended that underneath to really create that smokey effect.  Add a pair of your fav false eye lashes and that's your eye make up complete!  I really love this look, it's perfect for a glam occasion. If you have any difficulties, please leave a comment below.

What do you think of this make up look? Will you be attending the Grad Ball? :)


Lots of love - Suzanne P.D.

Saturday 28 November 2015

My Latest Make Up Purchases!

Hey everyone and welcome back!

This post is going to be about my latest make up purchases.  I bought three items from this amazing site called Make Up Revolution and my other items from Beauty Bay. Here are the links below:

The make up revolution site: http://www.makeuprevolutionstore.com/
The Beauty Bay site: http://www.beautybay.com/

So let's get started!

I bought this beautiful eye shadow palette and a Rose Gold and Pure Platinum eye shadow from Make Up Revolution.


The eye shadow palette is called "The Mermaid Forever" palette and the two other separate eye shadows are "Awesome Metals" foil finish in Rose Gold and Pure Platinum. The Mermaid palette has 32 gorgeous colours and it was only 8 pounds!! Which is totally worth it! Here are the colours below:


You have your light shades, then dark and then there are some fun colours to experiment with. I really love this palette, the eye shadows are very pigmented and there's a great variety of colours. 

However, I prefer the "Awesome Metals"....


I've been wanting an eye shadow that's extremely shimmery, glittery and that just stands out! I finally found them!!! This eye shadow has a full metallic foil finish.  When you buy this product it contains the eye shadow, liquid eye primer and a mixing tray. The liquid eye primer and the mixing tray comes with it so that it intensifies the look. You put a small drop of the primer on the tray and a small bit of the eye shadow into the tray. Mix them together and you have such a beautiful and intense finish! The picture above on the right is the "Pure Platinum" and the photo above on the left is the "Rose Gold" and in the other photo there is the tray and the eye primer that comes along with it.  I am absolutely obsessed with these!! They are so beautiful and I can't explain enough how much I love them.  The end result is just stunning and they are long lasting. There are 5 different colours on the site and they are only 4 pounds each.  Which is just amazing.  Those are my Make Up Revolution buys.


  Now time for my purchases from Beauty Bay. 


I bought 4 Morphe eye shadow brushes.  I heard so much about this brand and so I finally decided to try out their brushes and I can say that I love them. I'm so pleased that I bought them. The first photo above is the M502 round blender blush. It's extremely soft and it's the perfect blending brush. The photo below on the left is the B15 large chisel fluff brush, perfect for application on the lid and crease. I love the size of this brush. The photo below on the right is the S20 Delux Precision Crease Brush and the last photo is the S11 Delux Oval Shadow brush. I love these brushes and I highly recommend them!


So those are my recent purchases! Really hope you enjoyed reading this post, if you have any questions or difficulties please leave a comment below. 

Lots of Love - Suzanne P.D.

Sunday 22 November 2015

Shimmery Eye Shadow Review!

As you all know, last Wednesday I went to the Essence and Catrice Event and they were so lovely to give us some make up to try out and review.  In my last post about this event, I mentioned three eye shadows which I absolutely fell in love with as soon as I saw them and I shall be writing about these in this post.

I tried out the eye shadows and I can truly say that I absolutely love them!! The eye shadows are the "All about Greys" palette from Essence and the Catrice "Trio Deluxe".  The Essence palette, as the name gives it away, are different shades of dark and light grey shimmery eye shadows, also with a white and a black shade.  The Catrice palette on the left has aubergine tones and the one of the right are soft brown eye shadows. They are both shimmery and they are new to the collection.  These palettes are perfect for any occasion and you can really create an awesome smokey eye look!


I did an eye shadow swatch of the colours so that you all can see the colours.  They are so pigmented and they look great.  Here is the Essence palette.  From the photo you can tell how shimmery they are and I just love shimmery eye shadows, they really look great on.  You can use the light shades for a soft smokey eye look for during the day, then you can use the darker shades for an evening look. The black shade is so pigmented and it's perfect for a black smokey eye!  Also, the lightest shade I used as a highlighter. I just applied some on my cheekbones to really pop out that highlight.  The photo of myself, I used the light shades of the palette.  I'm totally in love with this palette, has 8 great colours and you can totally play around with lots of different looks with the different shades.


Now for the Catrice eye shadows.


 This is the aubergine colour palette and I find these colours really pretty and it's something different in my opinion.  This palette is really good for beginners to create a smokey eye, as it's in order - from light to dark. Basically, use the light colour on the lid, the second shade on the crease then darken that out with the last colour and you have your smokey eye!  This is easier for people than having an eye shadow palette with lots of colours as some people might get confused.  There are also the steps on the back of the palette.  Which is very helpful! Here are the colours in the photo below.


These are the soft brown eye shadows.  I love the golden tones and how shimmery it is. So beautiful for any occasion.  This palette is also great for beginners, as I mentioned above.  I am very happy with this palette, such beautiful pigmented colours. The soft brown eye shadows are so pigmented and perfect for that brown smokey eye. Brown eye shadows are always a must have as they are the perfect go to make up look. These are also new to the collection.


So that's my review regarding these eye shadow palettes!  Really hope that this was helpful, if you have any difficulties or questions, leave a comment below.

What do you think about these palettes? 


Lots of love - Suzanne P.D.


Wednesday 18 November 2015

Essence and Catrice Event

Hey everyone and welcome back!

I was invited to a High Tea event at the Hilton by Essence and Catrice and this was my very first make up event!! I was so excited and so nervous at the same time.  I had no idea what to expect and didn't know anyone who was going.  I made sure to look my best and of course to have my make up slayed!


The event was so amazing and met so many talented and beautiful people there.  It was so inspiring talking to other bloggers and some of them really gave me some great advice.  I feel so grateful that Essence and Catrice invited me to their event, everything was amazing and their products are just fantastic! Was so much fun testing out different eye shadows, lipsticks, etc. They also gave us a goodie bag full of make up, which was just to die for!!!

A product from Catrice which really stole my heart is the "Ultimate Stay" Plum lipstick in the number 070. The colour is just absolutely beautiful!! Perfect for the Autumn/Winter season. When I applied this to test the lipstick, the colour was so intense and pigmented, with this satin-matte finish. The "Ultimate Stay" collection has other colours also.


Another product of Catrice and Essence that I am totally excited to try out and experiment with are their eye shadow palettes! The Essence "All about Greys" palette which is full of beautiful light and dark grey tones and the Catrice "Deluxe" Trio eye shadows.  Will definitely write another post using these eye shadows and showing you guys different looks with these, so stay tuned for that one.


Now I shall show you guys my make up look for this event! I wanted to go more towards neutral eye shadows with a nude lip and a bronzed look. I used my NYX eye shadow palette and my MAC nude lipstick.  This was an afternoon event so that's why I avoided dark colours.  A brown smokey eye is always so beautiful for during the day. 


Absolutely loved this event and can't wait to try out all their products!! Really hope that you enjoyed reading this post and if you have any questions or difficulties, feel free to leave a comment below. 

What's your favourite product from Essence or Catrice?

Lots of Love - Suzanne P.D

Thursday 12 November 2015

Graduation Make Up Look!

Congratulations to all those people who are graduating in the next few couple of days/weeks!

Since it is the month of Graduations, I decided to create a make up look which I feel is perfect for the Graduation ceremony.  This is your special day and you definitely want to look your absolute best! Loads of people will be taking photos of you and so you have to have stunning make up.  I don't suggest going very heavy with the make up, so try and avoid dark colours.  Go more towards the neutrals, browns and some light colours. I chose to use shimmery brown eye shadows with a pink lip. I used my brand new Mermaids Forever Palette from Make Up Revolution for this look. I really like this palette and I'm so happy with it.  Totally affordable and arrived so fast. Here is the link: http://www.makeuprevolutionstore.com/


And that is the look! A very beautiful brown smokey eye, with some shimmer and a flawless coverage.  Now I'm going to tell you how I did this look and the products used.

Since so many people will be taking photos of you, in my opinion your skin has to look flawless! So it is really important to exfoliate your skin first so that you remove any dead skin cells and also this helps makes your skin nice and smooth.  I used my Vichy Exfoliating wash and afterwards I applied some moisturizer because it really dries my face. I used my Simple moisturizer. It is very important to moisturize for that perfect coverage.  If you can, I also suggest you use a face mask on that day to really have nice and perfect skin.

Of course, very important to prime your face so that your make up will last longer, I used my Collistar face primer for this. For foundation, you want to use a long lasting one and I used my Maybelline Super Stay 24H foundation and then I concealed under my eyes, spots and any blemishes with my WJCON liquid concealer.  To set all of this I used my Rimmel Stay Matte powder.


Now for the eyes! First prime your eyes and I used my Collistar eye primer. This will make your eye shadow last longer.  Once the primer is setting, start defining and filling in your eyebrows. The brows frame the face, do not go crazy with your eyebrows, so a nice and natural brow is perfect for this look.  In the photo on the right below, I used a mixture of the four brown/neutral colours (the second row). For the lid I used the colour "Treasure" (the top one) which is a beautiful gold shimmer colour and I used the colour underneath, "Kingdom", on the crease. I blended that colour with the last colour in that row which is called "Seabed". Blend that out nicely and add the third colour just for some more definition which is called "Mineral".  I blended some of those colours under the eye to create a more smokey effect. For the tear duct, I applied the second colour on the first row in the left photo, which is called "Seashell" to really highlight that area and make my eyes pop out. Then I applied a golden eyeliner on the waterline, to really have that golden look. For my winged eyeliner, I did not do a crazy wing, just a small and sharp wing.  Using of course my NYX liquid eyeliner.  Apply mascara and add some falsies! If you don't like wearing false eyelashes then apply your best mascara to have beautiful full lashes - I used the Shiseido full lash volume mascara, which is absolutely amazing, on the bottom lashes.


To finish off the face - of course you have to contour your cheekbones, temples and your nose! I used my Seventeen contour kit. To really make your cheekbones stick out, highlight above the contour, also the tip of your nose, above your eyebrows and your cupid's bow. Contouring makes you look more defined in photos and highlighting brings out certain features that you highlighted. I used my favourite "Soft and Gentle" highlighter from MAC. For the blush I used my NYX, "Intuition" blush which is a pretty red/pink colour.

Lastly - the lips! I did not want to use a dark coloured lipstick, so I chose to use a pink lipstick. I used the Revlon Colourburst matte balm crayon in the number 210 "unapologetic".  It is like a big crayon which is super. Then I used the Maybelline Colour Sensational gloss to make my lips shiny. And that's it!


Really hope you enjoyed reading this post! Of course if you have any difficulties or questions, feel free to leave a comment below. What do you think of this make up look? 


Lots of love - Suzanne P.D.

Tuesday 10 November 2015

How to do a fierce winged eyeliner!

Hey everyone and welcome back!

This post is going to be about how you can kill people with your sharp, fierce winged eyeliner!!!

                                                                  .........Just kidding! 

But, I shall be showing you guys exactly how I do my winged eyeliner :)
I absolutely LOVE applying liquid eyeliner and I am all about doing a crazy and really exaggerated wing!  It's definitely my favourite part when I'm applying my make up. So I want to show you step by step exactly how I manage to do this.  

First of all, I use a liquid eyeliner.  I personally prefer liquid eyeliners instead of gel/cream or pencils. I find them great and I just got really used to using them.  However, it is not the easiest thing to use, you definitely need a steady hand and to be really careful when applying it.  Also, practice makes perfect, so don't give up if it's not great the first time, eventually you will manage!  I definitely recommend a liquid eyeliner if you want a fierce and well defined wing.  I will be showing you a simple and easy way how to apply eyeliner and some different eyeliner styles too.  I use the NYX liquid eyeliner for all of this - I've been so happy with this eyeliner, it's absolutely super!  It's very dark black and it's the perfect size.


Firstly, apply a thin line on your upper lash line.  If you do not have a steady hand, I suggest you rest your elbow on a table and do this slowly and carefully.  Start from the centre and continue till the end of your eye and till the tear duct.  If you're still finding it difficult to create this line, apply lots of dots on the upper lash line and then just join them.


After you finish applying the line, create your tail!  Position the eyeliner brush on the outer edge of your eyelid and create a line upwards.  Use the tip of your eyebrow as a guide for the tail!  If you find this difficult, grab a piece of tape and stick it from the end of your eyebrow to the edge of the eyelid. This will be your guide for that perfect wing! Once that's done, create a triangle.  So from your eyelid till the tip of the point as shown in the photos below.


The final step is to fill in the space and that's it!  You have a fierce wing! If you feel you went over the triangle mark, you can always grab a concealer brush to fix the little mistakes. Also, if you feel your winged eyeliner is not sharp enough, concealer helps to create a sharp and defined wing. Apply the concealer right underneath the wing and on top, of course blend that out.


Now I'm going to show you some different styles of winged eyeliners.  The picture above is a simple winged eyeliner look.  If you want a more dramatic look, I suggest you do the exact same steps, however this time you make the line much thicker, to create a thick and fierce wing. Like the photo below. I went over my eyeliner to create a thicker line and a thicker wing. 


You can also add another wing to that! Double winged eyeliner. All you have to do is apply the eyeliner underneath the water line and carry it up underneath the first wing. This look is an awesome fun party look and it's something different.


If you still want something more dramatic and more cat eye looking, then you can have something like the picture below.  You carry on applying the eyeliner underneath the water line till the tear duct and create a little point.  Then join the point with the eyeliner on the upper lash line.  In the photo below, I kept my double wing, however you can remove the second wing.


If these looks are a bit too much, then I suggest a small winged eyeliner look.  Do not apply the eyeliner way too thick, create a thin line. This look is very elegant and simple. For this you would just have to create a very small triangle and do not put a lot of product on the brush.  As you can see in the photo below, the line is very sharp and thin.


So those are my winged eyeliner looks! Really hope that you liked them and that this post was helpful in some way.  If you have any questions or difficulties regarding how to apply eyeliner, then leave a comment below and I shall reply right away.  Feel free to leave any comments!


Lots of love - Suzanne P.D.